At
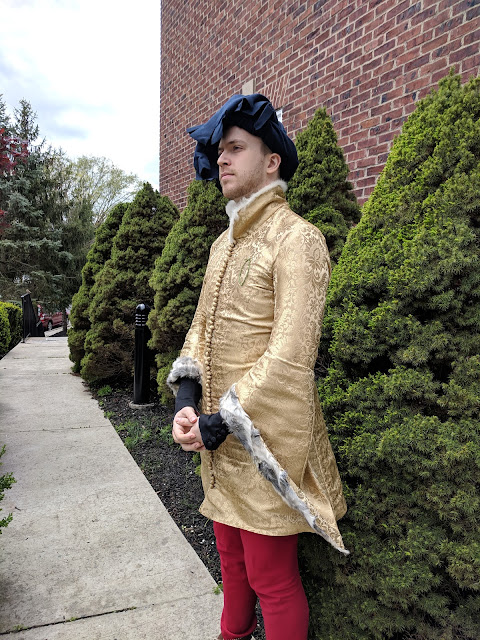
the end of all this work, I had one final garment to assemble: a cotehardie. I wanted to push the style a little towards the end of period and chose to do angel-wing sleeves and a standing collar, which matched a black example from the
Tristan wall hanging, and also shows up in some other contexts, such as this altar front from Bellver de Cerdanya:
 |
| Non-free. I didn't note what book this was from :/ |
These features would later develop into houpellandes, but I didn't wand to a) figure out an entirely new pattern and b) I'm fabulous and wanted to show off.
I'm very happy with the overall outfit, although it has a number of significant snags,
particularly with the under layer.
Materials
I chose five yards of a gold and beige "silk" fabric that was on sale from Etsy at a delightful price for the shell, on the advice that the pattern was more or less appropriate. I expected the gold thread to be plastic, but unfortunately it seems, after a burn test, that the other threads are also not totally silk. Tears.
The fabric was also a total nightmare to work with: it shreds at the slightest touch, and I'm still finding bits of gold and fluff around my house. It even pulled out of a 1/2" seam allowance behind the shoulder...
But it looks great! I lined the body and upper sleeves with the same light grey tabby silk as my doublet... and found
this at Birka to line the lower sleeves and neck:
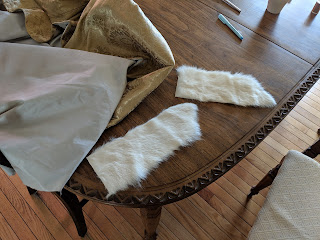
That's about two square yards of
vair, plus two rabbit pelts. This is some unpleasant number of squirrels all sewn together. It's very medieval and surprisingly soft! I lined the lower sleeves with the vair, and used the rabbit to line the collar. Rabbit fur is known to shed a lot, so this won't stand up to a lot of wear, but it is delightfully soft so oh well.
Construction
The basic pattern was the same as the doublet, except somewhat longer, and with the arm holes moved 3/4" or so away from the body so that the seams do not line up and cause oddness.
The neck modification was the first challenge, but not one that was so difficult. The Medieval Tailor's Assistant recommends for the high collar cutting a V into the back following a line from the shoulder. I then drafted a guess at the collar from the instructions in the book, and had a friend fine-tune it on the doublet. As the center back seam is not actually center (see my asymmetries in the previous post), the collar is also not symmetrical, so this took some doing. This will be a source of future challenge, as we will see.
 |
Photo care of Simon Pride. Non-free.
And ain't it a photo? Geeze. Guy puts me to shame. |
The collar wound up just a little too tall in the back, but oh well. It's fine. During our marathon Delaware sewing weekend, I cut out the body of the cote, taking care to match the pattern as best I could in the center and center back:
 |
| Tracing the muslin. I used a ruled line at the bottom to figure the approximate length. |
 |
| Tracing the fashion fabric onto the lining |
 |
| If you look carefully, you can see my new system for right/left right/wrong marking, reading 友反 "right side of body, wrong side of fabric". |
 |
| The "silk" didn't want to press at all. |
 |
| For the center back seam, I did a herringbone stitch, but for the side seams it bunched. I reverted to a pick stitch. Couldn't do this on the sleeves at all though. |
At a separate marathon sewing weekend in Maryland, I prepared the collar:
 |
| Washable fabric markers are a blessing. |
 |
| Interlined with linen for stiffness. |
 |
| Padstitching and then folding in the edge |
Clever readers will note that I cut out the fur lining so that the fur is on the interior of the fabric. Oops. I decided to just roll with it and swap the sides. This caused me to be unable to sew the back seam of the fur down, but it's fine. In the future I may cut out new linings, or edit these to fit better.
Cutting fur is a nuisance. You cut from the back, since you don't want to cut the actual fluff, but you should only juuuust cut through the leather, which is pretty hard to pull off. The craft knife worked decently.
Soon, I had something like clothing!
The next challenge was the sleeves.
Vika and I spent some time fiddling and draping to get the foofy sleeves to hang right, which is very important. The sleeves need to hang so that the point is down, and not off to one side, but also do so without odd puckering. This was a challenge. But we did it!
 |
| Undersleeve drafted |
 |
| Sleeve attempt together |
When I cut the sleeves, I didn't pay attention to pattern matching because
so much sewing, but by chance I managed to not only pattern match the upper sleeves placing one of the large pattern pineapple things over each of my deltoids, I matched them to opposite pattern repeats which looks clever and intentional. Hooray for happy accidents.
With the sleeves cut and assembled, there was just one step remaining: to cut the fur lining. The sleeves were somewhat sized so that they would fit the fur I had reasonably well, using the existing edge of the fur as an edge to minimize cutting.
 |
| Laying an undersleeve and oversleeve. The edge of the sleeve is against the horizontal edge of the fur. |
 |
| Final spot checking to make sure I got all my backwards and forwards straightened out and don't cut two left sleeves. |
I didn't have a craft knife to cut the fur with, so I used scissors. This fur was a lot more difficult: it was tougher and dryer - and probably much older. I hit it with leather conditioner twice, which helped. At first I tried to use my big sewing scissors, but they were too clunky for the delicate dance needed to bring the blade right up to the leather, leaving the hair uncut. I moved to my embroidery snips, which worked much better. I might even prefer them to the knife.
 |
| Cut out, plus scraps. The front edges of the sleeves align with the vair pattern. |
Because the vair is sewn together, cutting it destabilizes it somewhat, so care had to be taken not to damage it. Once sewn on, it becomes stable again.
For all of the fur, I tried to sew just slightly over the edge of the fabric so that the fur curls outwards slightly. This is more showy and a little more comfortable than having the fabric against your skin.
Before I put the sleeves in, I got more help and hemmed the thing:
Turns out that reading the instructions for hemming in the Readers' Digest sewing manual is actually a good idea, as my hem is
so much better than the doublet. Learning!
Finally, I sewed the sleeve lining in. I had put a short silk lining in which just came down to below the level of the fur. I tacked that down and then put in the assembled fur sleeve and sewed it in. The fur is heavy, stiff, and strong, so this needed enough stitches for strength, but not a ton to keep it in place. There is a medium problem that the left sleeve doesn't quite hang on center, but oh well.
Finally, I was done with the minimum viable cotehardie!
I had to be sewn in at Mudthaw
 |
| Thank you so much, dear, patient, friends |
But it looked great!
 |
| And, by blinding the judges with the shiny fabric, they couldn't read my documentation well enough to criticize it. Score! |
But something was missing. What could it be. Could it be fifty-six buttons? Ah, yes, that's it.
Ad astra, ad nauseam, or whatever that line is.
These buttons are similar to the doublet's sleeve buttons except that:
- The fabric sucks more
- There are more of them
- They're not squeezed in the middle because I don't have to do them one-handed.
I think the round buttons look quite a bit nicer, too, but they take more care to get neat. I definitely got better: the bottom buttons are less polyhedral and more spherical.
Then came fifty-six button
holes!
These are thankfully faster than the buttons. I had a little bit of a hard time getting a thread I wanted because Superior Threads apparently keeps nothing in stock, but this color worked fine.
I don't have a chisel to cut the holes like a good medieval person, so I folded the fabric and used my fabric shears, and then cut the slit wider with embroidery snips. This worked fine, but was a little messier and left the holes a little inconsistent: the top few holes are hard to close, particularly with my limited range of motion in this thing. I wound up getting help buttoning up.
But I'm really excited to have finished this thing! I learned so much, and made something I'm proud of, even if it has flaws. I hope you enjoyed this series.
My next textile project is likely to be a late Viking outfit.
Bonus glamor shots:
 |
| Silly faces! |
 |
| I'm a little proud of the fit of the hose, too. |
 |
| Serious medieval business |
 |
| The brass effigy look |
 |
| ...or not |
 |
| Silly faces part II |
 |
| Sleeves and buttons up close |
All images are also released under this license except as noted.


great work. you are fabulous!
ReplyDelete